Migrating to a Logger with Sensei

Migrating to a Logger with Sensei
This post describes creating a recipe to migrate from System.out.println to using a Java Logger.
When I'm hacking out code, rather than using TDD, and I make mistakes, I have the bad habit of printing a line to System.out, and I've wanted to wean myself off that habit.
I made a bunch of mistakes when writing the code below :
private String getCountdownString() {
String output = "";
String prefix="";
for(int countdown = 10; countdown > 0; countdown-- ){
output = output + prefix + countdown;
System.out.println(output);
prefix=", ";
}
System.out.println(output);
return output;
}
Initially, I wrote countdown++ and the loop didn't finish.
And I used countdown > 1 so didn't get the output I wanted.
In the end, I littered my code with System.out.println to help me debug. And the experience reinforced that I need to learn how to use a logger as my default approach.
Research
Fortunately, I read through the Sensei documentation and decided to use the "Getting Started" guide to help me create a recipe to convert from System.out.println and encourage me to use a logger:
- java.util.logging.Logger
Creating a Recipe
The first thing I do is click on the println then alt+enter to create a new recipe.

I create it with the following details:
Name: Logger: use logger instead of println
Description: use logger instead of println - remember to stop using System.out.println
Level: Error
And I'll start by matching methodcall with the name println
search:
methodcall:
name: "println"
And the preview shows me all the matches in my code.
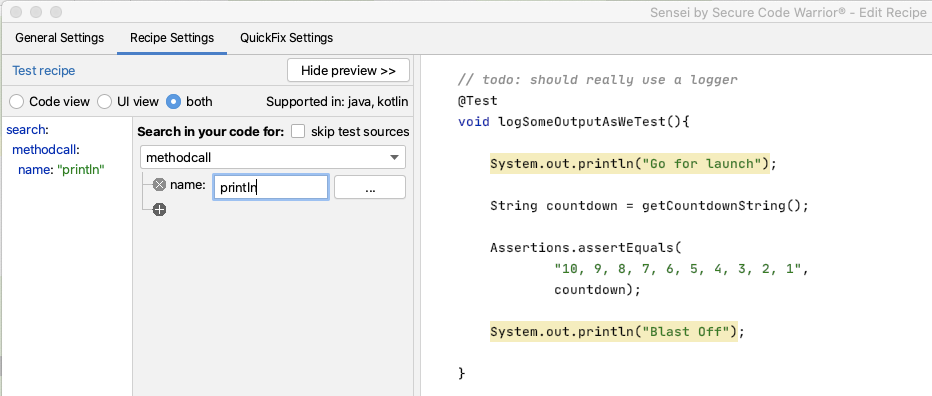
I can see that all the matches in my code are for System.out.println but I don't trust that long term this will be the only match. I want to match a more qualified statement I want to change.
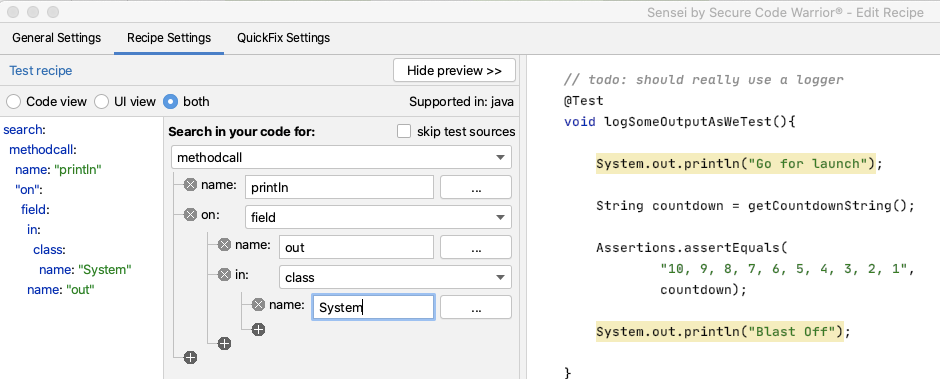
I expand the matcher to search for a methodcall on a field named out in the class System.
search:
methodcall:
name: "println"
"on":
field:
in:
class:
name: "System"
name: "out"
I could, if I wanted, fully qualify the System name to java.lang.System
Amending the Code to log
Next, I want to create the QuickFix.
First I want to amend the line of code that logs the output:
availableFixes:
- name: "use Logger"
actions:
- rewrite:
to: "logger.log(Level.INFO, {{{ arguments.0 }}})"
I don't have to remember the mustache template format. I used the Show Variables in the GUI to show me the argument and double-clicked on it. Then the GUI filled in the appropriate matching mustache template.
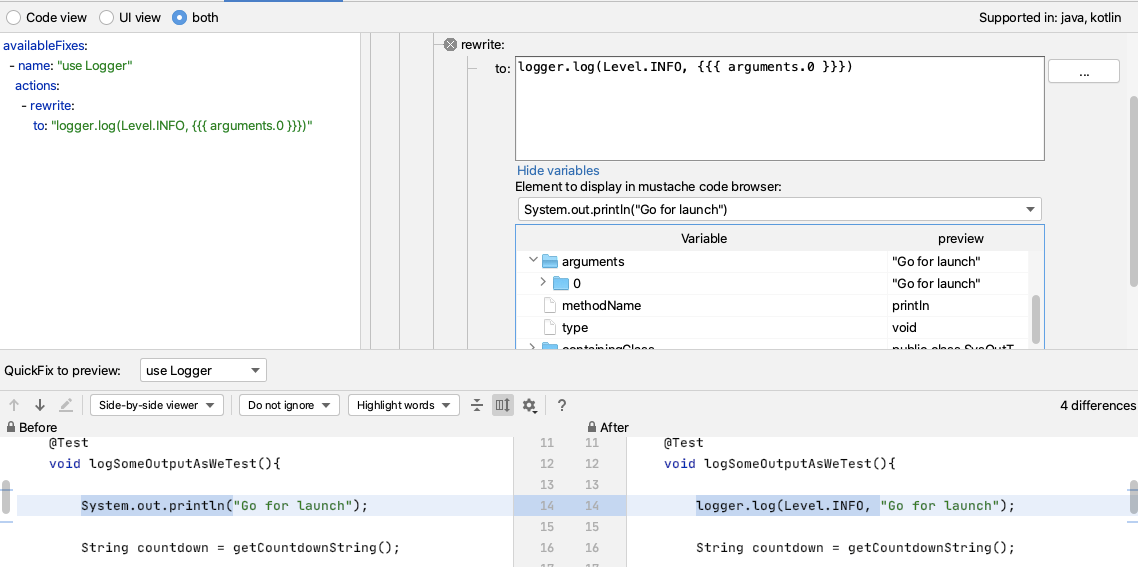
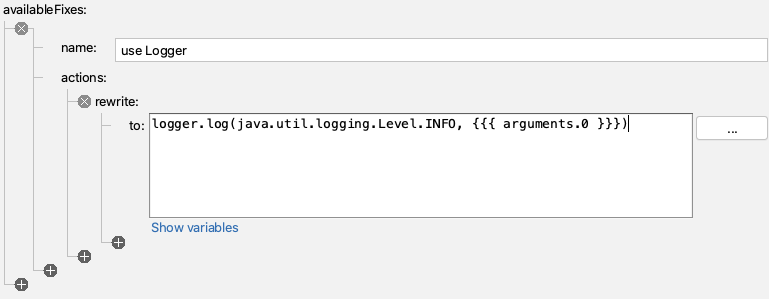
When I try it out, I can see that I still have to alt+enter to import the Level enum. But if I amend my QuickFix to have a fully qualified item then Sensei will add the import for me e.g.
- It will replace System.out.println(output); with
logger.log(Level.INFO, output);
- And add an import for the enum:
import java.util.logging.Level;
- If I rewrite to:
logger.log(java.util.logging.Level.INFO, {{{ arguments.0 }}})
And this will work, but I will still have to remember the syntax to instantiate the logger in the first place.
Amending the code to add the logger field
I can amend my QuickFix to create the field for me as well.
I will code the logger first, and then add that to my recipe so I never have to code it again.
Logger logger2 = Logger.getLogger(SysOutTest.class.getName());
I tend to write the example code I want to see generated first because then I can use IntelliJ code completion and syntax checking to make sure I get it right. As a side-effect, it will then be in the code preview when I edit the recipe to add the QuickFix lines that will create that code.
And when I write the example code, I want to use a different field name (here I'm using logger2) because Sensei is clever enough not to add a duplicate field, so I have to fool it by using a different name.
So I'll amend the recipe to create this code by adding a field called logger.
availableFixes:
- name: "use Logger"
actions:
- rewrite:
to: "logger.log(java.util.logging.Level.INFO, {{{ arguments.0 }}})"
- addField:
field: "java.util.logging.Logger logger = Logger.getLogger({{{ containingClass.name\
\ }}}.class.getName())"
target: "parentClass"
Note that I changed SysOutTest to be a mustache variable so that it picks up the name of any class I use this recipe in. And again, I didn't remember the mustache syntax, I used the GUI Show Variables to find the replacement I needed.
By fully qualifying the Logger to java.util.logging.Logger, Sensei will add the import and write the line of code that I want i.e.
Logger logger = Logger.getLogger(SysOutTest.class.getName());
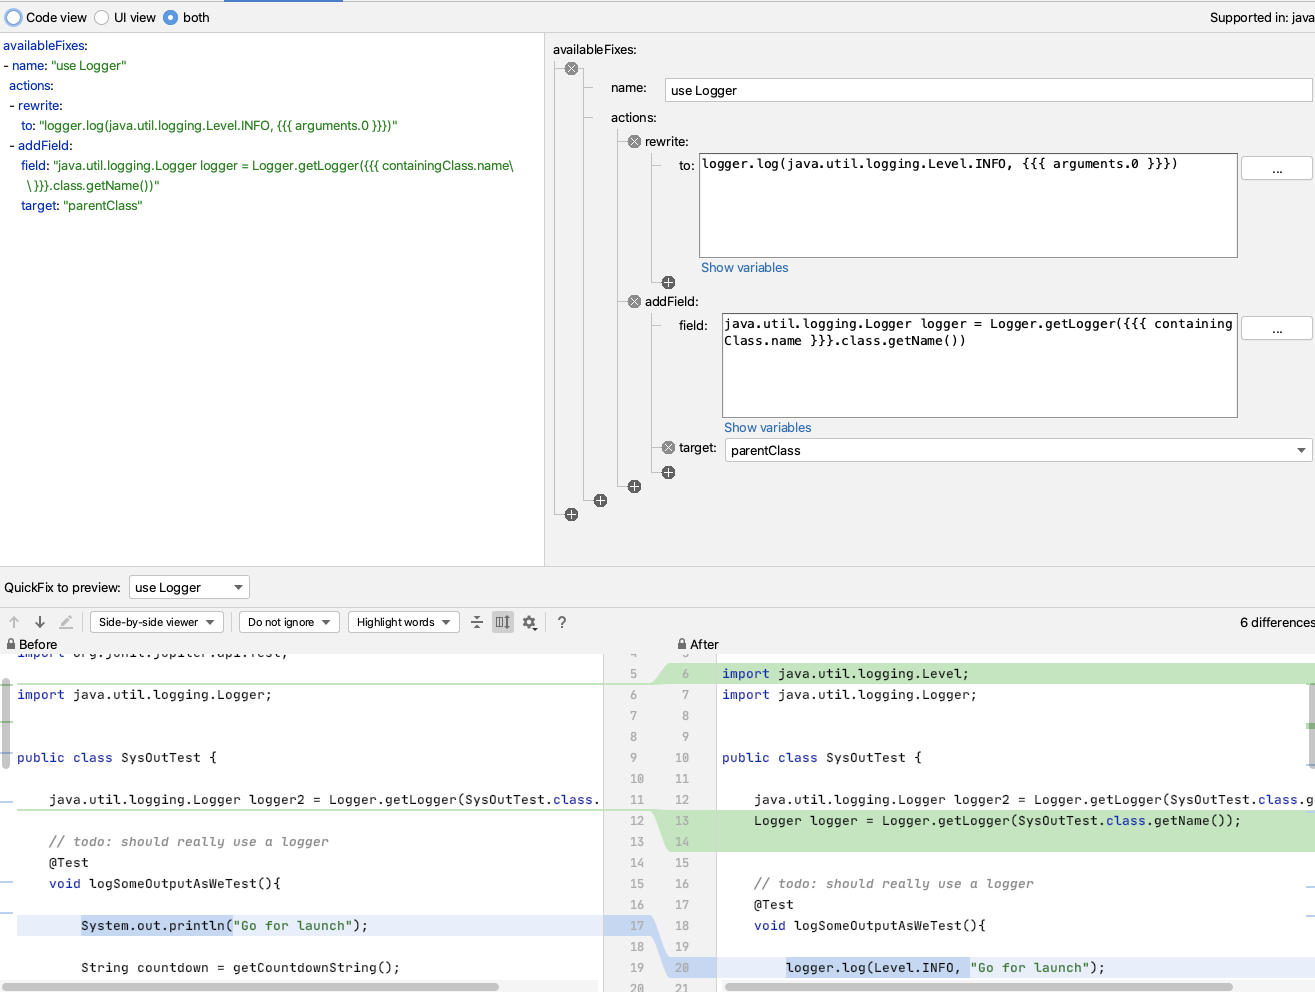
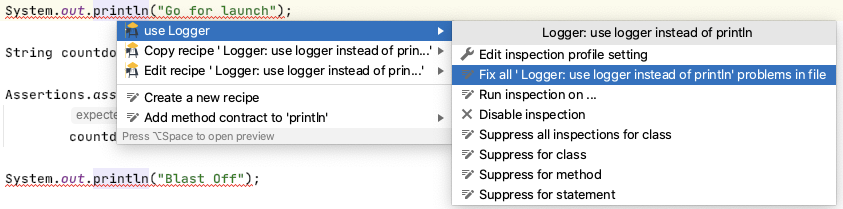
One useful thing about this recipe is that because it will only add the logger field once, I can use this on any existing code where I have used `System.out.println` and use Sensei to change all the occurrences in my code file at the same time.
Next Steps
Once I get used to this, I'll eventually train myself away from using System.out.println.
I can use Sensei to help me proactively write code by creating a second recipe which helps me create a logger.
e.g. I can match on a class, where there is no field called logger, and add one.
If I create a recipe of level Information
Name: Logger: add logger
Description: Add logger to class
To match on a class without a logger field:
search:
class:
without:
child:
field:
name: "logger"
And then I will reuse part of the QuickFix we saw earlier:
availableFixes:
- name: "Add Logger"
actions:
- addField:
field: "java.util.logging.Logger logger = Logger.getLogger({{{ containingClass.name\
\ }}}.class.getName())"
target: "self"
Note the difference in target here compared to the first QuickFix. This uses self because our Search matched the class. The first QuickFix uses parentClass because we matched code within the class itself.
Summary
This represents one of the key flows associated with using Sensei to help improve your personal programming skillset:
- create a recipe to help with your immediate 'best practice'
- once you know how to use that best practice... create a recipe to make your workflow faster
---
You can install Sensei from within IntelliJ using "Preferences \ Plugins" (Mac) or "Settings \ Plugins" (Windows) then just search for "sensei secure code".
The source code and recipes for this can be found in the `sensei-blog-examples` repository in the Secure Code Warrior GitHub account, in the `pojoexamples` module.
Kontrollieren Sie KI-gestützte Entwicklung, bevor sie in Produktion geht
Bewerten Sie KI-gestützte Risiken, setzen Sie Richtlinien für sicheren Code direkt beim Commit durch und beschleunigen Sie die sichere Bereitstellung über Ihren gesamten SDLC hinweg.
Weitere Blogs entdecken
Erhalten Sie Zugang zu Experteninhalten über sichere Programmierung, KI-Governance und Software-Risikomanagement.
%252520%252520(3).avif)
Supercharged Security Awareness: How Tournaments are Inspiring Developers at Erste Group
Lorem ipsum dolor sit amet, consectetur adipiscing elit. Suspendisse varius enim in eros elementum tristique. Duis cursus, mi quis viverra ornare, eros dolor interdum nulla, ut commodo diam libero vitae erat. Aenean faucibus nibh et justo cursus id rutrum lorem imperdiet. Nunc ut sem vitae risus tristique posuere.

Security as culture: How Blue Prism cultivates world-class secure developers
Learn how Blue Prism, the global leader in intelligent automation for the enterprise, used Secure Code Warrior's agile learning platform to create a security-first culture with their developers, achieve their business goals, and ship secure code at speed

Eine Sicherheitskultur: Wie Sage sein Champions-Programm aufgebaut hat
Erfahren Sie, wie Sage die Sicherheit durch einen flexiblen, beziehungsorientierten Ansatz gestärkt, über 200 Security Champions ausgebildet und eine messbare Risikoreduzierung erzielt hat.
Cybersecurity Awareness Month 2026: Das Verständnis von KI-Sicherheit ist entscheidend für die Unternehmensverteidigung
Wir haben einen Punkt erreicht, an dem die meisten führenden KI-Unternehmen öffentlich eine weltweite Verlangsamung der KI-Entwicklung gefordert haben, damit die Sicherheitsvorkehrungen Schritt halten können. Doch die Wahrheit ist: Ernsthafte Sicherheitsprobleme sind bereits Realität geworden. Dies bringt unzählige Sicherheitsverantwortliche und Führungsteams in eine dringliche Lage, da die finanziellen Kosten und Risiken durch die Implementierung von KI stetig steigen.
Enabler 8: Branding für Ihr Programm
Ein Programm für sicheres Programmieren braucht mehr als nur großartige Inhalte, um erfolgreich zu sein. Enabler 8 zeigt, wie Branding die Teilnahme zu einem begehrten, statusorientierten Erlebnis macht.
.avif)
Jeder Mitarbeiter steht jetzt an vorderster Front der KI-Cybersicherheit
Die Unternehmenslandschaft wandelt sich mit einer Geschwindigkeit, die kaum jemand vorhergesehen hat, bis es zu spät war. Wir haben offiziell die Schwelle von handgeschriebenem Code und einfacher Copilot-Unterstützung hin zur Ära des Agentic Development Lifecycle (ADLC) überschritten. Während autonome KI-Agenten eine beispiellose Effizienz in vielen Bereichen versprechen, bringen sie auch eine völlig neue Klasse von Sicherheits- und Regulierungsrisiken mit sich.
Sichere KI-gestützte Entwicklung vor dem Release
Erkennen Sie Entwicklerrisiken, setzen Sie Richtlinien durch und verhindern Sie Schwachstellen über den gesamten Softwareentwicklungszyklus hinweg.
