

Hinzufügen von Parametern zu Anmerkungen mithilfe von Rewrite-Aktionen


In this blog post, we will:
- Demonstrate searching and matching annotations
- Amen annotations using mustache templates
Sensei provides the ability to match problematic code patterns and then amend them to agreed implementations. In this example, I am using @Disabled without a parameter as the problematic code pattern.
Disabled Test Annotation
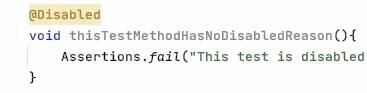
Disabled tests without a specified reason can prove problematic over the long term because we forget why we disabled it.
@Disabled
void thisTestMethodHasNoDisabledReason(){
Assertions.fail("This test is disabled and should not run");
}
The risk is that, over time, the code base moves on, the disabled test is not updated in step with the purpose of the code and eventually becomes redundant and irrelevant, and potentially never re-enabled.
During code reviews, we will often point out that it is a good idea to add an explanatory description as the annotation parameter.
@Disabled ("Disabled to demonstrate adding a reason")
void thisTestMethodHasDisabledReason(){
Assertions.fail("This test is disabled and should not run");
}
A Sensei Recipe
We can write a recipe to detect when @Disabled is added without explanation and a Quick Fix that reminds us to add the actual reason explaining why we disabled it.
When I think about what I'm going to do, I have to:
- match the Disabled annotation without any parameters
- change the Disabled annotation to have a parameter with marker text "TODO: add a description here"
Create a Warning Recipe
I use Alt+Enter to Create a new Recipe.
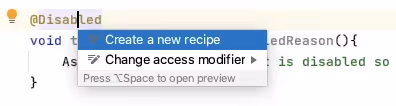
Then add the basic descriptive text in the general information.

By making the rule a warning, any matching code is highlighted but not shown as a glaring error.
Find the Annotation
In the recipe editor, I change the Search to match an annotation.
This will highlight all annotations in the preview.
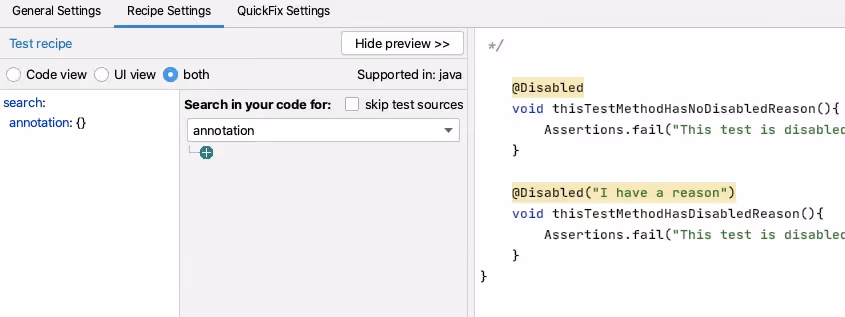
Having done that, I want to filter on the type of annotation.
I could just use Disabled but I fully qualify the class with the package so that it only matches the annotation from JUnit 5. Because the source code is shown in the preview, I can easily copy and paste this in from the actual code to avoid any typos.
I then want to match only annotations without Parameters, and I can use the GUI to do that.
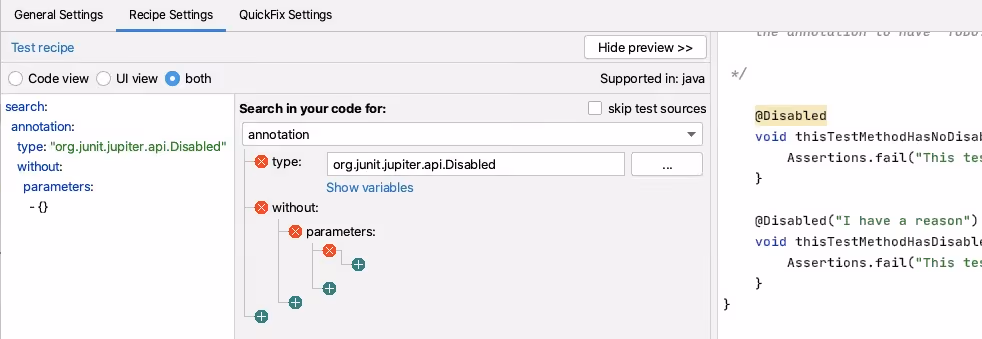
i.e. Search:
search:
annotation:
type: "org.junit.jupiter.api.Disabled"
without:
parameters:
- {}
Create a Rewrite Quick Fix Action
For my QuickFix I will use a rewrite action.
I use the Show Variables functionality to show me the Mustache variables and preview the contents.
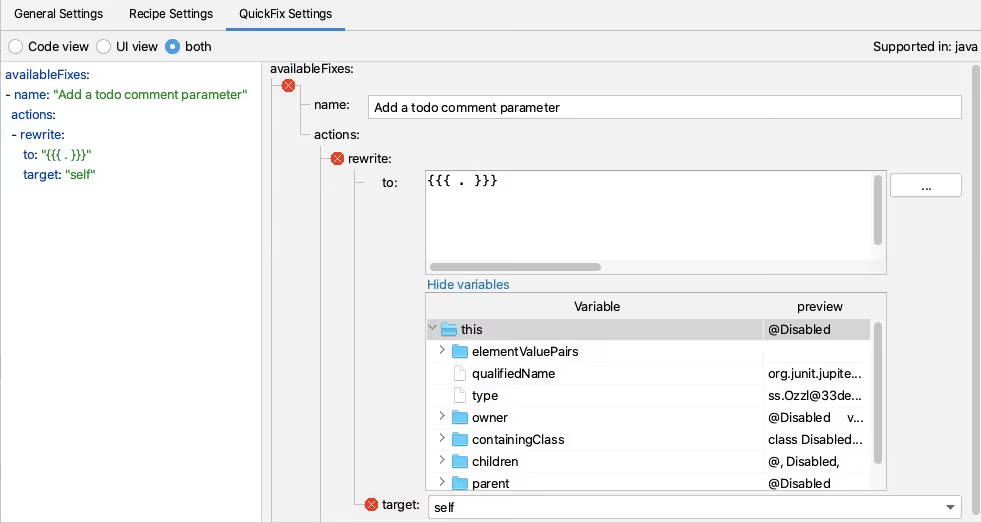
And then I add the extra code needed to create the place marker comment.
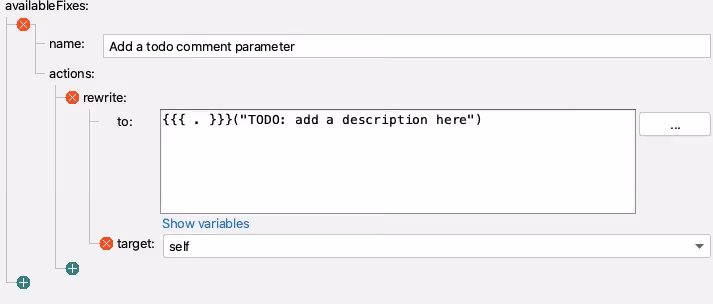
i.e. QuickFix:
availableFixes:
- name: "Add a todo comment parameter"
actions:
- rewrite:
to: "{{{ . }}}(\"TODO: add a description here\")"
target: "self"
Sensei in Action
We have created a short video showing the recipe creation process in action.
Summary
When building a rewrite Quick Fix, it is easier when we can search for the code element that we want to rewrite, because it is then the self entity we can act on.
In this example, I used a rewrite action to amend the Annotation. Rewrite is a general-purpose action that can apply to any code element and is a good default to explore.


Erfahren Sie, wie Sie Sensei verwenden, um problematische Codemuster abzugleichen und sie dann anhand von Beispielen für den Annotationsabgleich zu vereinbarten Implementierungen zu ändern.
Alan Richardson has more than twenty years of professional IT experience, working as a developer and at every level of the testing hierarchy from Tester through to Head of Testing. Head of Developer Relations at Secure Code Warrior, he works directly with teams, to improve the development of quality secure code. Alan is the author of four books including “Dear Evil Tester”, and “Java For Testers”. Alan has also created online training courses to help people learn Technical Web Testing and Selenium WebDriver with Java. Alan posts his writing and training videos on SeleniumSimplified.com, EvilTester.com, JavaForTesters.com, and CompendiumDev.co.uk.
Secure Code Warrior ist für Ihr Unternehmen da, um Ihnen zu helfen, Code während des gesamten Softwareentwicklungszyklus zu sichern und eine Kultur zu schaffen, in der Cybersicherheit an erster Stelle steht. Ganz gleich, ob Sie AppSec-Manager, Entwickler, CISO oder jemand anderes sind, der sich mit Sicherheit befasst, wir können Ihrem Unternehmen helfen, die mit unsicherem Code verbundenen Risiken zu reduzieren.
Eine Demo buchen


Alan Richardson has more than twenty years of professional IT experience, working as a developer and at every level of the testing hierarchy from Tester through to Head of Testing. Head of Developer Relations at Secure Code Warrior, he works directly with teams, to improve the development of quality secure code. Alan is the author of four books including “Dear Evil Tester”, and “Java For Testers”. Alan has also created online training courses to help people learn Technical Web Testing and Selenium WebDriver with Java. Alan posts his writing and training videos on SeleniumSimplified.com, EvilTester.com, JavaForTesters.com, and CompendiumDev.co.uk.
In this blog post, we will:
- Demonstrate searching and matching annotations
- Amen annotations using mustache templates
Sensei provides the ability to match problematic code patterns and then amend them to agreed implementations. In this example, I am using @Disabled without a parameter as the problematic code pattern.
Disabled Test Annotation
Disabled tests without a specified reason can prove problematic over the long term because we forget why we disabled it.
@Disabled
void thisTestMethodHasNoDisabledReason(){
Assertions.fail("This test is disabled and should not run");
}
The risk is that, over time, the code base moves on, the disabled test is not updated in step with the purpose of the code and eventually becomes redundant and irrelevant, and potentially never re-enabled.
During code reviews, we will often point out that it is a good idea to add an explanatory description as the annotation parameter.
@Disabled ("Disabled to demonstrate adding a reason")
void thisTestMethodHasDisabledReason(){
Assertions.fail("This test is disabled and should not run");
}
A Sensei Recipe
We can write a recipe to detect when @Disabled is added without explanation and a Quick Fix that reminds us to add the actual reason explaining why we disabled it.
When I think about what I'm going to do, I have to:
- match the Disabled annotation without any parameters
- change the Disabled annotation to have a parameter with marker text "TODO: add a description here"
Create a Warning Recipe
I use Alt+Enter to Create a new Recipe.
Then add the basic descriptive text in the general information.
By making the rule a warning, any matching code is highlighted but not shown as a glaring error.
Find the Annotation
In the recipe editor, I change the Search to match an annotation.
This will highlight all annotations in the preview.
Having done that, I want to filter on the type of annotation.
I could just use Disabled but I fully qualify the class with the package so that it only matches the annotation from JUnit 5. Because the source code is shown in the preview, I can easily copy and paste this in from the actual code to avoid any typos.
I then want to match only annotations without Parameters, and I can use the GUI to do that.
i.e. Search:
search:
annotation:
type: "org.junit.jupiter.api.Disabled"
without:
parameters:
- {}
Create a Rewrite Quick Fix Action
For my QuickFix I will use a rewrite action.
I use the Show Variables functionality to show me the Mustache variables and preview the contents.
And then I add the extra code needed to create the place marker comment.
i.e. QuickFix:
availableFixes:
- name: "Add a todo comment parameter"
actions:
- rewrite:
to: "{{{ . }}}(\"TODO: add a description here\")"
target: "self"
Sensei in Action
We have created a short video showing the recipe creation process in action.
Summary
When building a rewrite Quick Fix, it is easier when we can search for the code element that we want to rewrite, because it is then the self entity we can act on.
In this example, I used a rewrite action to amend the Annotation. Rewrite is a general-purpose action that can apply to any code element and is a good default to explore.
Klicken Sie auf den Link unten und laden Sie das PDF dieser Ressource herunter.
Secure Code Warrior ist für Ihr Unternehmen da, um Ihnen zu helfen, Code während des gesamten Softwareentwicklungszyklus zu sichern und eine Kultur zu schaffen, in der Cybersicherheit an erster Stelle steht. Ganz gleich, ob Sie AppSec-Manager, Entwickler, CISO oder jemand anderes sind, der sich mit Sicherheit befasst, wir können Ihrem Unternehmen helfen, die mit unsicherem Code verbundenen Risiken zu reduzieren.
Bericht ansehenEine Demo buchen
Alan Richardson has more than twenty years of professional IT experience, working as a developer and at every level of the testing hierarchy from Tester through to Head of Testing. Head of Developer Relations at Secure Code Warrior, he works directly with teams, to improve the development of quality secure code. Alan is the author of four books including “Dear Evil Tester”, and “Java For Testers”. Alan has also created online training courses to help people learn Technical Web Testing and Selenium WebDriver with Java. Alan posts his writing and training videos on SeleniumSimplified.com, EvilTester.com, JavaForTesters.com, and CompendiumDev.co.uk.
In this blog post, we will:
- Demonstrate searching and matching annotations
- Amen annotations using mustache templates
Sensei provides the ability to match problematic code patterns and then amend them to agreed implementations. In this example, I am using @Disabled without a parameter as the problematic code pattern.
Disabled Test Annotation
Disabled tests without a specified reason can prove problematic over the long term because we forget why we disabled it.
@Disabled
void thisTestMethodHasNoDisabledReason(){
Assertions.fail("This test is disabled and should not run");
}
The risk is that, over time, the code base moves on, the disabled test is not updated in step with the purpose of the code and eventually becomes redundant and irrelevant, and potentially never re-enabled.
During code reviews, we will often point out that it is a good idea to add an explanatory description as the annotation parameter.
@Disabled ("Disabled to demonstrate adding a reason")
void thisTestMethodHasDisabledReason(){
Assertions.fail("This test is disabled and should not run");
}
A Sensei Recipe
We can write a recipe to detect when @Disabled is added without explanation and a Quick Fix that reminds us to add the actual reason explaining why we disabled it.
When I think about what I'm going to do, I have to:
- match the Disabled annotation without any parameters
- change the Disabled annotation to have a parameter with marker text "TODO: add a description here"
Create a Warning Recipe
I use Alt+Enter to Create a new Recipe.
Then add the basic descriptive text in the general information.
By making the rule a warning, any matching code is highlighted but not shown as a glaring error.
Find the Annotation
In the recipe editor, I change the Search to match an annotation.
This will highlight all annotations in the preview.
Having done that, I want to filter on the type of annotation.
I could just use Disabled but I fully qualify the class with the package so that it only matches the annotation from JUnit 5. Because the source code is shown in the preview, I can easily copy and paste this in from the actual code to avoid any typos.
I then want to match only annotations without Parameters, and I can use the GUI to do that.
i.e. Search:
search:
annotation:
type: "org.junit.jupiter.api.Disabled"
without:
parameters:
- {}
Create a Rewrite Quick Fix Action
For my QuickFix I will use a rewrite action.
I use the Show Variables functionality to show me the Mustache variables and preview the contents.
And then I add the extra code needed to create the place marker comment.
i.e. QuickFix:
availableFixes:
- name: "Add a todo comment parameter"
actions:
- rewrite:
to: "{{{ . }}}(\"TODO: add a description here\")"
target: "self"
Sensei in Action
We have created a short video showing the recipe creation process in action.
Summary
When building a rewrite Quick Fix, it is easier when we can search for the code element that we want to rewrite, because it is then the self entity we can act on.
In this example, I used a rewrite action to amend the Annotation. Rewrite is a general-purpose action that can apply to any code element and is a good default to explore.
Inhaltsverzeichniss
Alan Richardson has more than twenty years of professional IT experience, working as a developer and at every level of the testing hierarchy from Tester through to Head of Testing. Head of Developer Relations at Secure Code Warrior, he works directly with teams, to improve the development of quality secure code. Alan is the author of four books including “Dear Evil Tester”, and “Java For Testers”. Alan has also created online training courses to help people learn Technical Web Testing and Selenium WebDriver with Java. Alan posts his writing and training videos on SeleniumSimplified.com, EvilTester.com, JavaForTesters.com, and CompendiumDev.co.uk.
Secure Code Warrior ist für Ihr Unternehmen da, um Ihnen zu helfen, Code während des gesamten Softwareentwicklungszyklus zu sichern und eine Kultur zu schaffen, in der Cybersicherheit an erster Stelle steht. Ganz gleich, ob Sie AppSec-Manager, Entwickler, CISO oder jemand anderes sind, der sich mit Sicherheit befasst, wir können Ihrem Unternehmen helfen, die mit unsicherem Code verbundenen Risiken zu reduzieren.
Eine Demo buchenHerunterladenRessourcen für den Einstieg


Ressourcen für den Einstieg
%20thumbnail.png)


Secure coding learning that reflects real AI usage
Align secure coding training to real AI development activity — automatically assigning guidance to developers using AI tools, without manual intervention.Align secure coding training to real AI development activity — automatically assigning guidance to developers using AI tools, without manual intervention.