Migrating to a Logger with Sensei


Migrating to a Logger with Sensei
This post describes creating a recipe to migrate from System.out.println to using a Java Logger.
When I'm hacking out code, rather than using TDD, and I make mistakes, I have the bad habit of printing a line to System.out, and I've wanted to wean myself off that habit.
I made a bunch of mistakes when writing the code below :
private String getCountdownString() {
String output = "";
String prefix="";
for(int countdown = 10; countdown > 0; countdown-- ){
output = output + prefix + countdown;
System.out.println(output);
prefix=", ";
}
System.out.println(output);
return output;
}
Initially, I wrote countdown++ and the loop didn't finish.
And I used countdown > 1 so didn't get the output I wanted.
In the end, I littered my code with System.out.println to help me debug. And the experience reinforced that I need to learn how to use a logger as my default approach.
Research
Fortunately, I read through the Sensei documentation and decided to use the "Getting Started" guide to help me create a recipe to convert from System.out.println and encourage me to use a logger:
- java.util.logging.Logger
Creating a Recipe
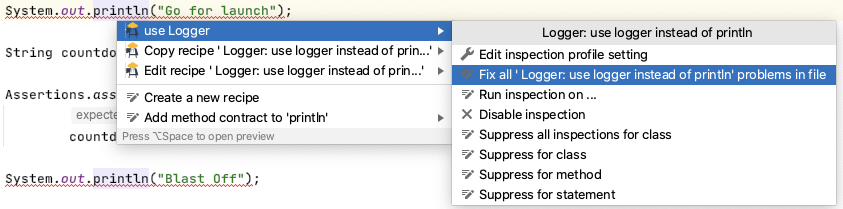
The first thing I do is click on the println then alt+enter to create a new recipe.
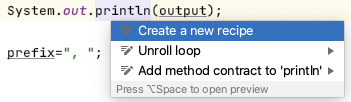
I create it with the following details:
Name: Logger: use logger instead of println
Description: use logger instead of println - remember to stop using System.out.println
Level: Error
And I'll start by matching methodcall with the name println
search:
methodcall:
name: "println"
And the preview shows me all the matches in my code.
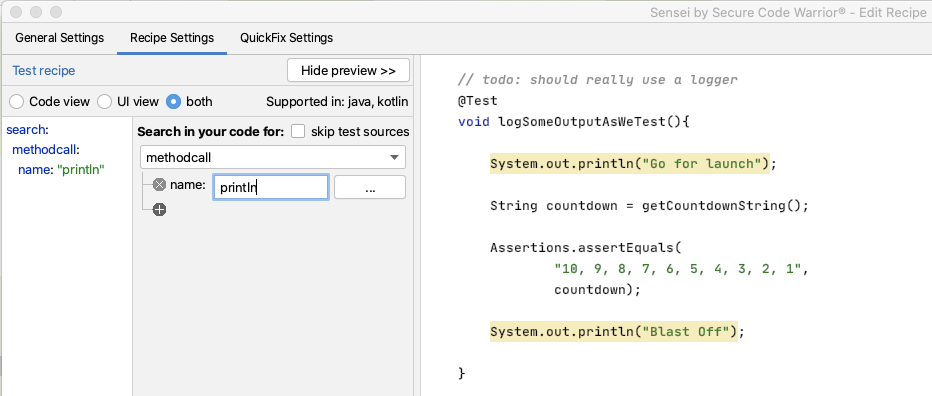
I can see that all the matches in my code are for System.out.println but I don't trust that long term this will be the only match. I want to match a more qualified statement I want to change.
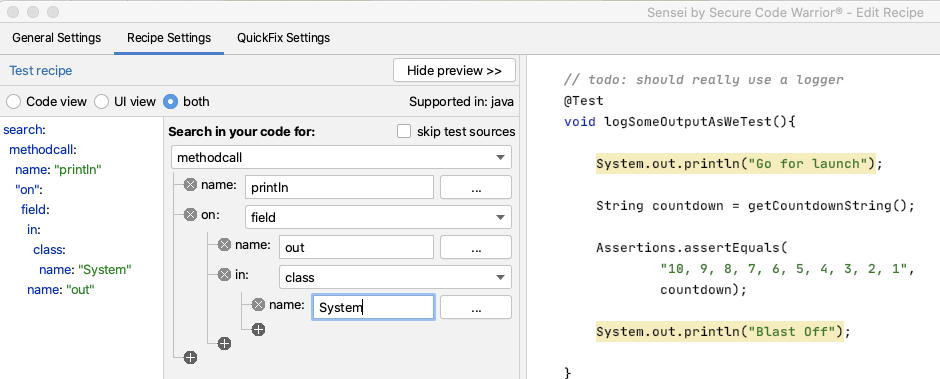
I expand the matcher to search for a methodcall on a field named out in the class System.
search:
methodcall:
name: "println"
"on":
field:
in:
class:
name: "System"
name: "out"
I could, if I wanted, fully qualify the System name to java.lang.System
Amending the Code to log
Next, I want to create the QuickFix.
First I want to amend the line of code that logs the output:
availableFixes:
- name: "use Logger"
actions:
- rewrite:
to: "logger.log(Level.INFO, {{{ arguments.0 }}})"
I don't have to remember the mustache template format. I used the Show Variables in the GUI to show me the argument and double-clicked on it. Then the GUI filled in the appropriate matching mustache template.
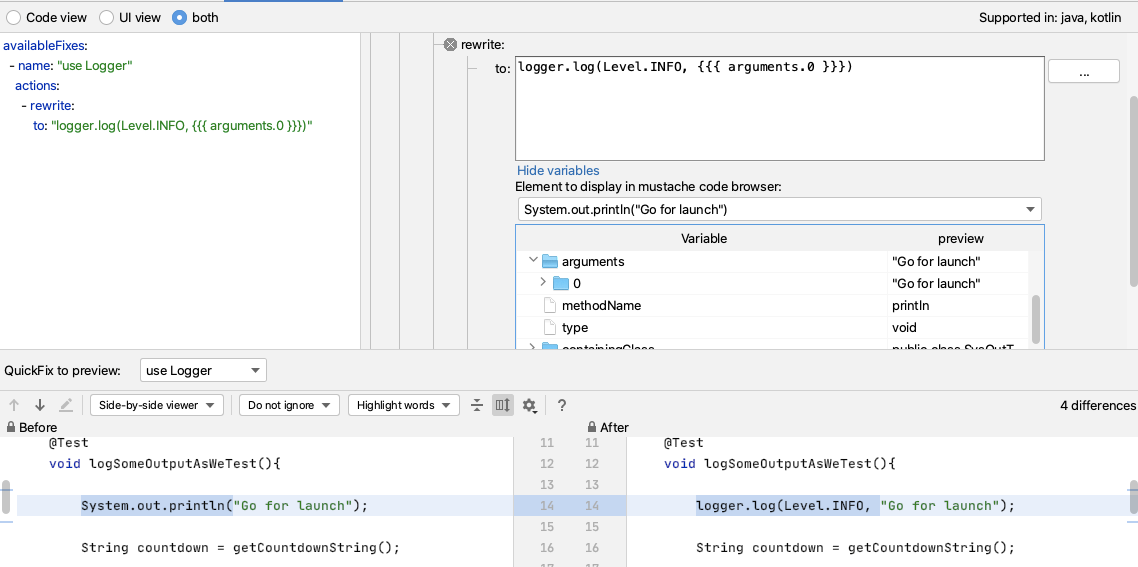
When I try it out, I can see that I still have to alt+enter to import the Level enum. But if I amend my QuickFix to have a fully qualified item then Sensei will add the import for me e.g.
- It will replace System.out.println(output); with
logger.log(Level.INFO, output);
- And add an import for the enum:
import java.util.logging.Level;
- If I rewrite to:
logger.log(java.util.logging.Level.INFO, {{{ arguments.0 }}})
And this will work, but I will still have to remember the syntax to instantiate the logger in the first place.
Amending the code to add the logger field
I can amend my QuickFix to create the field for me as well.
I will code the logger first, and then add that to my recipe so I never have to code it again.
Logger logger2 = Logger.getLogger(SysOutTest.class.getName());
I tend to write the example code I want to see generated first because then I can use IntelliJ code completion and syntax checking to make sure I get it right. As a side-effect, it will then be in the code preview when I edit the recipe to add the QuickFix lines that will create that code.
And when I write the example code, I want to use a different field name (here I'm using logger2) because Sensei is clever enough not to add a duplicate field, so I have to fool it by using a different name.
So I'll amend the recipe to create this code by adding a field called logger.
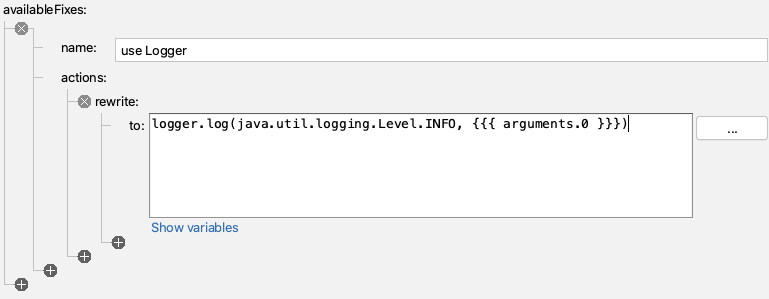
availableFixes:
- name: "use Logger"
actions:
- rewrite:
to: "logger.log(java.util.logging.Level.INFO, {{{ arguments.0 }}})"
- addField:
field: "java.util.logging.Logger logger = Logger.getLogger({{{ containingClass.name\
\ }}}.class.getName())"
target: "parentClass"
Note that I changed SysOutTest to be a mustache variable so that it picks up the name of any class I use this recipe in. And again, I didn't remember the mustache syntax, I used the GUI Show Variables to find the replacement I needed.
By fully qualifying the Logger to java.util.logging.Logger, Sensei will add the import and write the line of code that I want i.e.
Logger logger = Logger.getLogger(SysOutTest.class.getName());
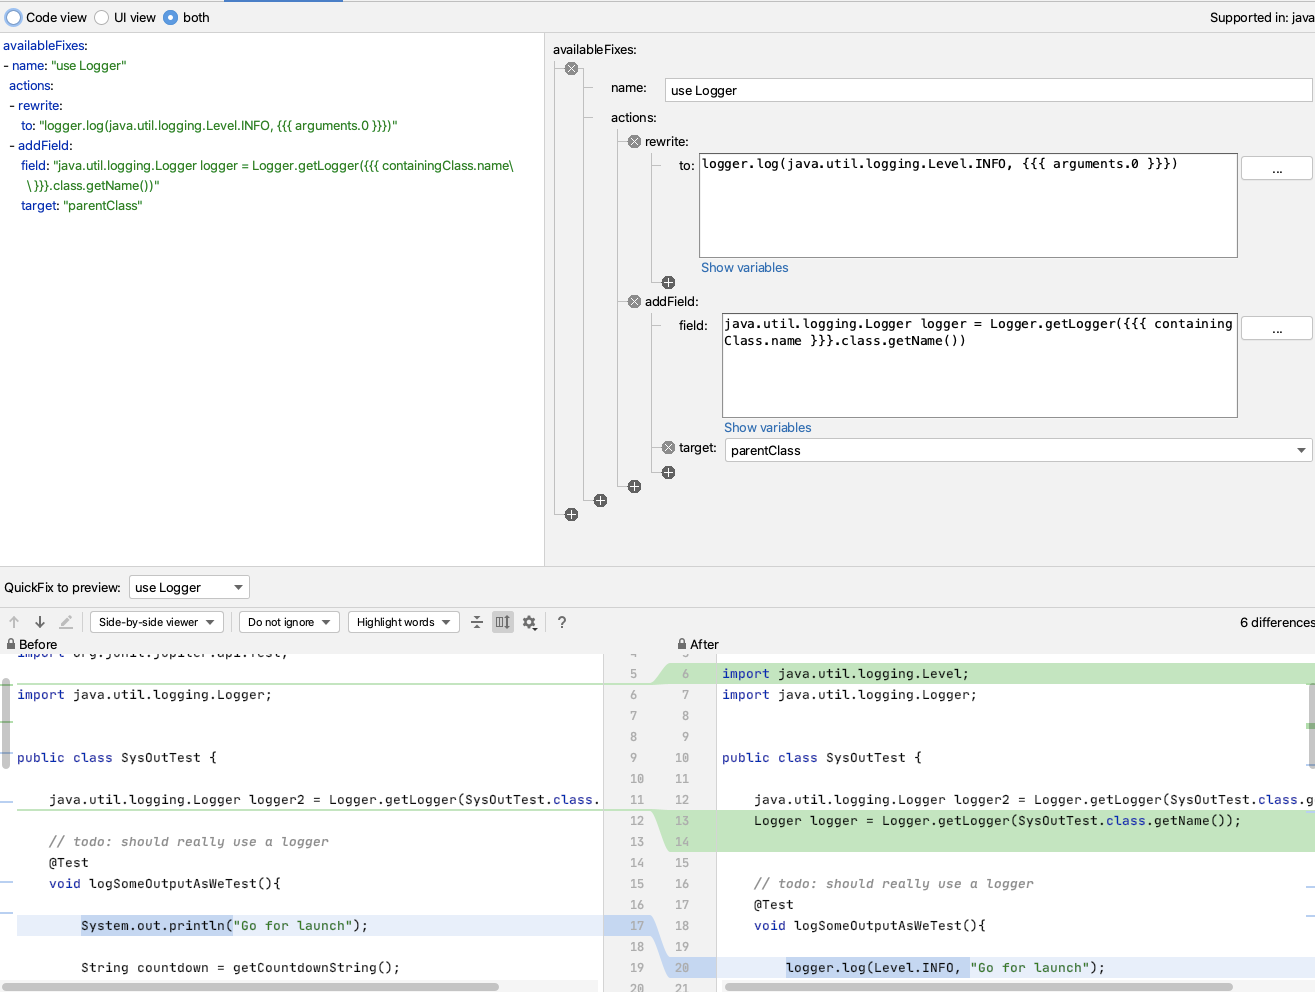
One useful thing about this recipe is that because it will only add the logger field once, I can use this on any existing code where I have used `System.out.println` and use Sensei to change all the occurrences in my code file at the same time.
Next Steps
Once I get used to this, I'll eventually train myself away from using System.out.println.
I can use Sensei to help me proactively write code by creating a second recipe which helps me create a logger.
e.g. I can match on a class, where there is no field called logger, and add one.
If I create a recipe of level Information
Name: Logger: add logger
Description: Add logger to class
To match on a class without a logger field:
search:
class:
without:
child:
field:
name: "logger"
And then I will reuse part of the QuickFix we saw earlier:
availableFixes:
- name: "Add Logger"
actions:
- addField:
field: "java.util.logging.Logger logger = Logger.getLogger({{{ containingClass.name\
\ }}}.class.getName())"
target: "self"
Note the difference in target here compared to the first QuickFix. This uses self because our Search matched the class. The first QuickFix uses parentClass because we matched code within the class itself.
Summary
This represents one of the key flows associated with using Sensei to help improve your personal programming skillset:
- create a recipe to help with your immediate 'best practice'
- once you know how to use that best practice... create a recipe to make your workflow faster
---
You can install Sensei from within IntelliJ using "Preferences \ Plugins" (Mac) or "Settings \ Plugins" (Windows) then just search for "sensei secure code".
The source code and recipes for this can be found in the `sensei-blog-examples` repository in the Secure Code Warrior GitHub account, in the `pojoexamples` module.
Alan Richardson


Related Articles We Recommend


Related Articles We Recommend


Dive into onto our latest secure coding insights on the blog.
Our extensive resource library aims to empower the human approach to secure coding upskilling.
Get the latest research on developer-driven security
Our extensive resource library is full of helpful resources from whitepapers to webinars to get you started with developer-driven secure coding. Explore it now.
Migrating to a Logger with Sensei
Migrating to a Logger with Sensei
This post describes creating a recipe to migrate from System.out.println to using a Java Logger.
When I'm hacking out code, rather than using TDD, and I make mistakes, I have the bad habit of printing a line to System.out, and I've wanted to wean myself off that habit.
I made a bunch of mistakes when writing the code below :
private String getCountdownString() {
String output = "";
String prefix="";
for(int countdown = 10; countdown > 0; countdown-- ){
output = output + prefix + countdown;
System.out.println(output);
prefix=", ";
}
System.out.println(output);
return output;
}
Initially, I wrote countdown++ and the loop didn't finish.
And I used countdown > 1 so didn't get the output I wanted.
In the end, I littered my code with System.out.println to help me debug. And the experience reinforced that I need to learn how to use a logger as my default approach.
Research
Fortunately, I read through the Sensei documentation and decided to use the "Getting Started" guide to help me create a recipe to convert from System.out.println and encourage me to use a logger:
- java.util.logging.Logger
Creating a Recipe
The first thing I do is click on the println then alt+enter to create a new recipe.
I create it with the following details:
Name: Logger: use logger instead of println
Description: use logger instead of println - remember to stop using System.out.println
Level: Error
And I'll start by matching methodcall with the name println
search:
methodcall:
name: "println"
And the preview shows me all the matches in my code.
I can see that all the matches in my code are for System.out.println but I don't trust that long term this will be the only match. I want to match a more qualified statement I want to change.
I expand the matcher to search for a methodcall on a field named out in the class System.
search:
methodcall:
name: "println"
"on":
field:
in:
class:
name: "System"
name: "out"
I could, if I wanted, fully qualify the System name to java.lang.System
Amending the Code to log
Next, I want to create the QuickFix.
First I want to amend the line of code that logs the output:
availableFixes:
- name: "use Logger"
actions:
- rewrite:
to: "logger.log(Level.INFO, {{{ arguments.0 }}})"
I don't have to remember the mustache template format. I used the Show Variables in the GUI to show me the argument and double-clicked on it. Then the GUI filled in the appropriate matching mustache template.
When I try it out, I can see that I still have to alt+enter to import the Level enum. But if I amend my QuickFix to have a fully qualified item then Sensei will add the import for me e.g.
- It will replace System.out.println(output); with
logger.log(Level.INFO, output);
- And add an import for the enum:
import java.util.logging.Level;
- If I rewrite to:
logger.log(java.util.logging.Level.INFO, {{{ arguments.0 }}})
And this will work, but I will still have to remember the syntax to instantiate the logger in the first place.
Amending the code to add the logger field
I can amend my QuickFix to create the field for me as well.
I will code the logger first, and then add that to my recipe so I never have to code it again.
Logger logger2 = Logger.getLogger(SysOutTest.class.getName());
I tend to write the example code I want to see generated first because then I can use IntelliJ code completion and syntax checking to make sure I get it right. As a side-effect, it will then be in the code preview when I edit the recipe to add the QuickFix lines that will create that code.
And when I write the example code, I want to use a different field name (here I'm using logger2) because Sensei is clever enough not to add a duplicate field, so I have to fool it by using a different name.
So I'll amend the recipe to create this code by adding a field called logger.
availableFixes:
- name: "use Logger"
actions:
- rewrite:
to: "logger.log(java.util.logging.Level.INFO, {{{ arguments.0 }}})"
- addField:
field: "java.util.logging.Logger logger = Logger.getLogger({{{ containingClass.name\
\ }}}.class.getName())"
target: "parentClass"
Note that I changed SysOutTest to be a mustache variable so that it picks up the name of any class I use this recipe in. And again, I didn't remember the mustache syntax, I used the GUI Show Variables to find the replacement I needed.
By fully qualifying the Logger to java.util.logging.Logger, Sensei will add the import and write the line of code that I want i.e.
Logger logger = Logger.getLogger(SysOutTest.class.getName());
One useful thing about this recipe is that because it will only add the logger field once, I can use this on any existing code where I have used `System.out.println` and use Sensei to change all the occurrences in my code file at the same time.
Next Steps
Once I get used to this, I'll eventually train myself away from using System.out.println.
I can use Sensei to help me proactively write code by creating a second recipe which helps me create a logger.
e.g. I can match on a class, where there is no field called logger, and add one.
If I create a recipe of level Information
Name: Logger: add logger
Description: Add logger to class
To match on a class without a logger field:
search:
class:
without:
child:
field:
name: "logger"
And then I will reuse part of the QuickFix we saw earlier:
availableFixes:
- name: "Add Logger"
actions:
- addField:
field: "java.util.logging.Logger logger = Logger.getLogger({{{ containingClass.name\
\ }}}.class.getName())"
target: "self"
Note the difference in target here compared to the first QuickFix. This uses self because our Search matched the class. The first QuickFix uses parentClass because we matched code within the class itself.
Summary
This represents one of the key flows associated with using Sensei to help improve your personal programming skillset:
- create a recipe to help with your immediate 'best practice'
- once you know how to use that best practice... create a recipe to make your workflow faster
---
You can install Sensei from within IntelliJ using "Preferences \ Plugins" (Mac) or "Settings \ Plugins" (Windows) then just search for "sensei secure code".
The source code and recipes for this can be found in the `sensei-blog-examples` repository in the Secure Code Warrior GitHub account, in the `pojoexamples` module.